In 2008 I noted I was 1% more productive than 2007 with 101 posts. This year my statistics have plummeted, with just on 56 posts, a huge drop in "productivity". I wonder if it's anything to do with having a second kid?
Like last year I find it an interesting exercise to look back over my blog's statistics to work out the most popular pages for the year.
In 2009 the top 5 read blog posts were:
• Using multiple faces-config.xml files in JSF
• Configuring WebLogic Server Domain/Machine/Server instances with the JDeveloper 11g ADF installer
• Configuring a JDev 11g ADF Security app on standalone WLS against MS Active Directory
• SoapUI for web service testing
• JDev/ADF: How to log user login/logout/timeout to the database
Like 2008 the multi-faces-config.xml post wins out again, being hit just over 5500 times in 2009. Again this is probably indicative that there's a lot of JSF programmers out there beyond ADF programmers.
Of content that was written in 2009, the top 5 blog posts were:
• Configuring WebLogic Server Domain/Machine/Server instances with the JDeveloper 11g ADF installer
• SoapUI for web service testing
• Stress & load testing web applications (even ADF & Apex) using Apache JMeter
• JAX-WS Provider API based endpoints in JDev 11g
• Enabling SSL and disabling non-SSL under WLS 10.3
These statistics aren't overly representative of the 2009 results as some posts were written later in the year. However the first post received on 2700 hits in 2009, not a surprise as many developers jumped onto the JDev 11g bandwagon and discovered (at the time) configuring WLS needed some thought. I also not a bias towards web service posts, but again they go beyond the Oracle arena where there are plenty more developers.
Like last year I have no large plans for the blog in 2010. My blogging is mostly based around problems and solutions I work on for clients, while I reserve more comprehensive solutions for the SAGE Computing Services training courses and the odd paper I write for OTN or Oracle User Group magazines.
I might still though get a few extra posts in before the end of the year. But if not I'd like to wish readers a relaxing Christmas and New Years or whatever you celebrate on your part of the big round thing.
Wednesday 16 December 2009
Upgrading WLS via Oracle Support maintenance patchsets
Recently I blogged about Upgrading WLS using the Oracle Smart Update utility. We discovered that while this utility will happily patch our developers' machines, we had h3lls own trouble trying to get it to work on our server. After much head scratching, gritting of teeth, yelling, begging and sobbing at our firewall administrators, without a solve, we decided a new approach was required.
As per Andreas Koop's comment in that original blog post, you can in fact run the Smart Update utility in offline mode, which implies you can download the patches and install them from the utility locally without directly connecting to the Oracle web services. However what I couldn't see was how to run the Maintenance Patch option in offline mode. Yet given the offline mode support it seemed reasonable that you could download a patchset from somewhere, and this post details where that's from.
Under Oracle Support's MOS and the HTML version you can click on the Patches and Updates tab.
In MOS under the Patch Search box with the Oracle, Siebel and Hyperion tab selected, click on the Product or Family link. From there as per the following screenshot enter WebLogic Server as the product, pick whichever release you want to upgrade to (not from), and the platform:
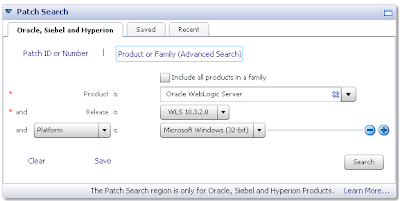
From here you can download the relevant patch:
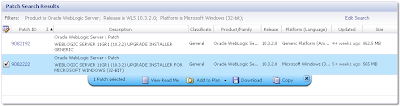
The MOS interface isn't ideal as you can't use download managers for speeding up the stupendous size of the patchsets. Alternatively the HTML version does. The following screenshot shows the equivalent search'n'results under HTML:
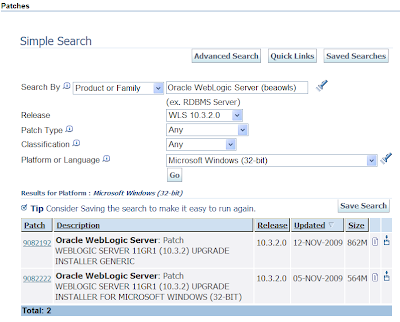
From the resulting downloaded zip, extract it and run the exe. This invokes the upgrade installer that looks similar to the normal WLS installer. The installer steps from then on are self explanatory, requiring you to pick the existing WLS home then proceeding with the installation.
Monday 14 December 2009
ADF UI Shell + ADF Security
This post covers off combining the new ADF UI Shell and ADF Security. Recently Oracle released the UI Shell based on the Oracle Dynamic Tabs Shell for JDeveloper 11g Release1 (aka PS1). I blogged about my initial research around the UI Shell here, and you can follow others' questions and answers on the ADF UI Patterns & Best Practices OTN forum.
It's important for me to note that both my original post and this post constitute my learnings, have not been tested in a production system, they could contain errors. As such your mileage may vary and it's important you do your own testing.
The UI Shell is an interesting concept in that it dictates your application will be composed of separate subsystems, each made up of a number of activities (aka. bounded task flows). The bounded task flows can in turn be shared by the subsystems.
What I wanted to consider in this post is what are the minimum requirements in applying ADF Security, or in other words, what permissions do we need to give to each of the design time parts in order to allow authenticated users to access the application. To discuss this I thought I'd base my example on the UI Shell demonstration application as detailed in the Oracle UI Shell Functional Pattern whitepaper.
In understanding how to apply ADF Security to the UI Shell example application we first need to identify all the moving parts that we need to apply security against:
1) In the UI Shell example application the application is divided into 3 subsystems, namely First, Second and Third. From a design time point of view each of these has an associated page First.jspx, Second.jspx and Third.jspx respectively.
2) In turn the First subsystem has a "welcoming" task flow comprised of a single page fragment called you.jsff. Potentially each subsystem can have its own welcoming task flow with page fragment, though in the example only one exists.
3) The First subsystem makes use of three activities (aka. bounded tasks flows using page fragments) called first, second and third (note the case difference, don't get these confused with the subsystem names which are initcapped), that in turn are simple bounded task flows using a single page fragment one.jsff, two.jsff and three.jsff respectively. The three activities are backed by task flow files first.xml, second.xml and third.xml.
With this in mind let setup a security scenario where we want to allow a user to access the First subsystem and all the associated activities, but not parts of the Second and Third subsystems.
The following steps describe the actions required in doing this:
1) You must first enable ADF Security for your application via the Application -> Secure -> Configure ADF Security menu option that invokes the Configure ADF Security wizard. As this wizard has been described in numerous other blogs I'll paraphase the options here:
Step 1 of 5
ADF Authentication and Authorisation
Step 2 of 5
Web Project: ViewController.jpr
Form-Based Authentication
Login Page: /login.html
Error Page: /error.html
Step 3 of 5
No Automatic Grants
Step 4 of 5
No options (Leave Redirect Upon Successful Authentication unselected)
Step 5 of 5
n/a
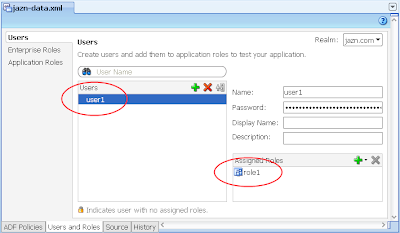
2) Via Application -> Secure -> Application Roles, configure a single Application Role "role1"
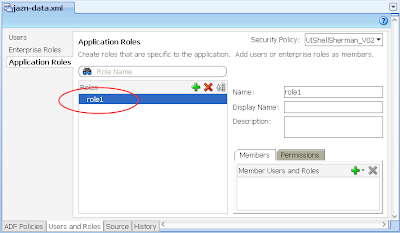
3) In the same jazn-data.xml editor, select the Users options on the left, then configure a single user "user1" and allocate them to "role1" Application Role you created in the last step.
---
What we need to from here is allocate basic access rights to the moving parts of the UI Shell that aren't specific to any subsystem. In other words the parts of the UI Shell that are shared by all subsystems regardless of the type of user.
You have a choice to make here. If you want your basic application to be available to any user regardless if they've authenticated (ie. logged in) or not, then in the following step you need to grant the "anonymous-role" privilege. Alternatively if you want your users to have to at least log in before accessing any part of the system, then you need to grant the "authenticated-role" privilege. If you're unfamiliar with these concepts please read the Oracle documentation. For this post I'll assume the "authenticated-role" privilege.
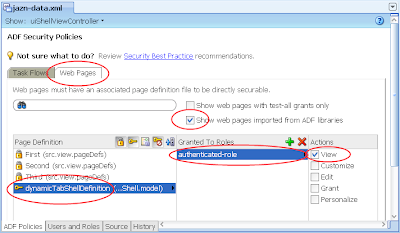
4) In the same jazn-data.xml editor, select the ADF Policies tab at the bottom. Select the Web Pages tab. Ensure the "Show web pages imported from ADF libraries" checkbox is selected. Under the Page Definitions table column select the dynamicTabShellDefinition option, then the green plus button in the "Granted to Roles" column, and select the authenticated-role role in the Select Role dialog:

The result in the jazn-data.xml will be:
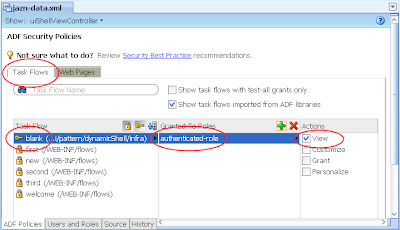
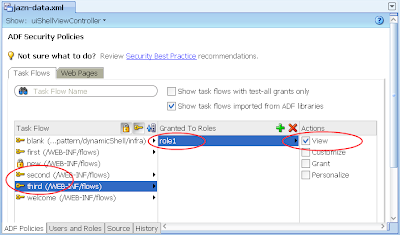
5) In the same jazn-data.xml editor with the ADF Policies tab still selected at the bottom, select the Tasks Flow tab. Ensure the "Show task flows imported from ADF libraries" checkbox is selected. Similar to the last step allocated the authenticated-role in the Select Role dialog to the "blank" task flow. The result:
---
From here we want to allocate the user1 with role1 privileges against the First subsystem.
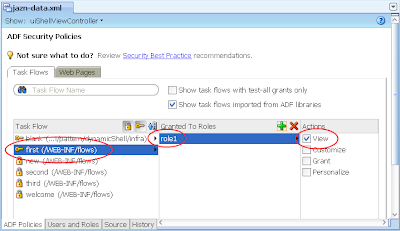
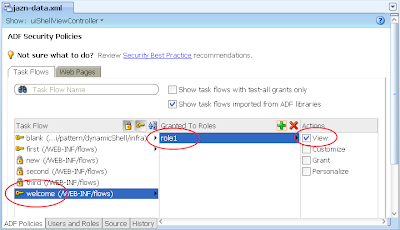
6) In the same jazn-data.xml editor with the ADF Policies tab and Tasks Flow tab open, allocate the role1 to the "first" task flow. The result:
7) Ditto, allocate role1 to the "welcome" task flow. The result:
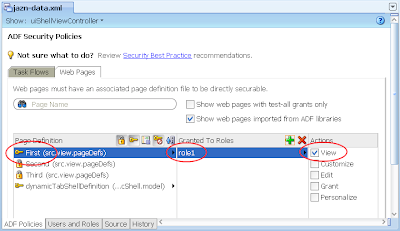
8) Switch back to the Web Pages tab, then allocate role1 to the First page:
---
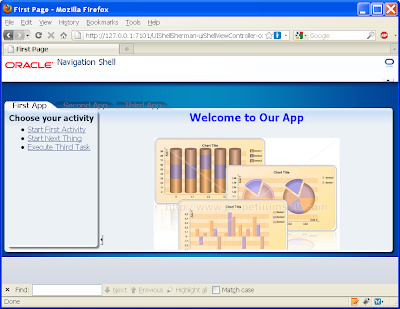
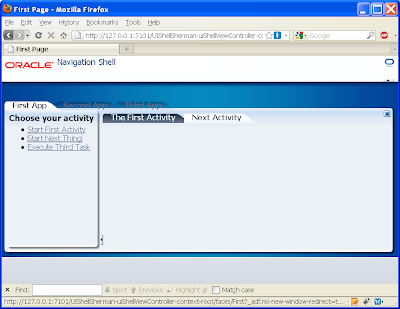
At this stage if you run your application, you'll note on accessing the First page the user will be hit with the login box straight away. A successful login lands on the First page showing the First subsystem.

If you click on one of the other main tabs such as Second App, the running page will return the following error message as expected as we haven't allocated user1 priviliges to the Second subsystem:
ADFC-0619: Authorization check failed: '/Second.jspx' 'VIEW'.
Ideally to stop this occurring we need to either disable or set the Second App tab's rendered property to false, through the following EL expression:
#{!securityContext.userInRole['role2']}
The result:
You'll need to make this change to every tab into every subsystem's page (First.jspx, Second.jspx, Third.jspx).
---
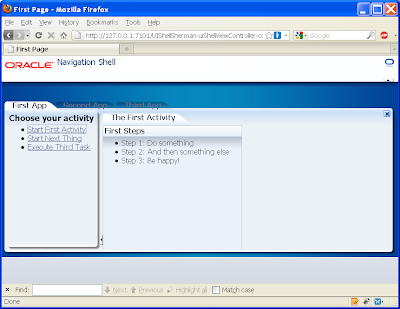
If we now open the first activity in the First subsystem page we get:
Yet if we open the second activity we get the following empty content:
This is to be expected as we haven't allocated the second.xml (or even the third.xml) to the role1 privilege. As back in step 6, allocate role1 against these under the jaxn-data.xml editor, ADF policies tab, Task Flow tab:
Alternatively if you don't want these activities available to role1, instead change the commandLink's to disable or un-render properties as per the EL securityContext example above.
--
In conclusion we see the UI Shell works pretty seamlessly with ADF Security, with the small caveat that you need to know which parts of the UI Shell to grant privileges to all users/roles.
It's important for me to note that both my original post and this post constitute my learnings, have not been tested in a production system, they could contain errors. As such your mileage may vary and it's important you do your own testing.
The UI Shell is an interesting concept in that it dictates your application will be composed of separate subsystems, each made up of a number of activities (aka. bounded task flows). The bounded task flows can in turn be shared by the subsystems.
What I wanted to consider in this post is what are the minimum requirements in applying ADF Security, or in other words, what permissions do we need to give to each of the design time parts in order to allow authenticated users to access the application. To discuss this I thought I'd base my example on the UI Shell demonstration application as detailed in the Oracle UI Shell Functional Pattern whitepaper.
In understanding how to apply ADF Security to the UI Shell example application we first need to identify all the moving parts that we need to apply security against:
1) In the UI Shell example application the application is divided into 3 subsystems, namely First, Second and Third. From a design time point of view each of these has an associated page First.jspx, Second.jspx and Third.jspx respectively.
2) In turn the First subsystem has a "welcoming" task flow comprised of a single page fragment called you.jsff. Potentially each subsystem can have its own welcoming task flow with page fragment, though in the example only one exists.
3) The First subsystem makes use of three activities (aka. bounded tasks flows using page fragments) called first, second and third (note the case difference, don't get these confused with the subsystem names which are initcapped), that in turn are simple bounded task flows using a single page fragment one.jsff, two.jsff and three.jsff respectively. The three activities are backed by task flow files first.xml, second.xml and third.xml.
With this in mind let setup a security scenario where we want to allow a user to access the First subsystem and all the associated activities, but not parts of the Second and Third subsystems.
The following steps describe the actions required in doing this:
1) You must first enable ADF Security for your application via the Application -> Secure -> Configure ADF Security menu option that invokes the Configure ADF Security wizard. As this wizard has been described in numerous other blogs I'll paraphase the options here:
Step 1 of 5
ADF Authentication and Authorisation
Step 2 of 5
Web Project: ViewController.jpr
Form-Based Authentication
Login Page: /login.html
Error Page: /error.html
Step 3 of 5
No Automatic Grants
Step 4 of 5
No options (Leave Redirect Upon Successful Authentication unselected)
Step 5 of 5
n/a
2) Via Application -> Secure -> Application Roles, configure a single Application Role "role1"

3) In the same jazn-data.xml editor, select the Users options on the left, then configure a single user "user1" and allocate them to "role1" Application Role you created in the last step.

---
What we need to from here is allocate basic access rights to the moving parts of the UI Shell that aren't specific to any subsystem. In other words the parts of the UI Shell that are shared by all subsystems regardless of the type of user.
You have a choice to make here. If you want your basic application to be available to any user regardless if they've authenticated (ie. logged in) or not, then in the following step you need to grant the "anonymous-role" privilege. Alternatively if you want your users to have to at least log in before accessing any part of the system, then you need to grant the "authenticated-role" privilege. If you're unfamiliar with these concepts please read the Oracle documentation. For this post I'll assume the "authenticated-role" privilege.
4) In the same jazn-data.xml editor, select the ADF Policies tab at the bottom. Select the Web Pages tab. Ensure the "Show web pages imported from ADF libraries" checkbox is selected. Under the Page Definitions table column select the dynamicTabShellDefinition option, then the green plus button in the "Granted to Roles" column, and select the authenticated-role role in the Select Role dialog:

The result in the jazn-data.xml will be:

5) In the same jazn-data.xml editor with the ADF Policies tab still selected at the bottom, select the Tasks Flow tab. Ensure the "Show task flows imported from ADF libraries" checkbox is selected. Similar to the last step allocated the authenticated-role in the Select Role dialog to the "blank" task flow. The result:

---
From here we want to allocate the user1 with role1 privileges against the First subsystem.
6) In the same jazn-data.xml editor with the ADF Policies tab and Tasks Flow tab open, allocate the role1 to the "first" task flow. The result:

7) Ditto, allocate role1 to the "welcome" task flow. The result:

8) Switch back to the Web Pages tab, then allocate role1 to the First page:

---
At this stage if you run your application, you'll note on accessing the First page the user will be hit with the login box straight away. A successful login lands on the First page showing the First subsystem.

If you click on one of the other main tabs such as Second App, the running page will return the following error message as expected as we haven't allocated user1 priviliges to the Second subsystem:
ADFC-0619: Authorization check failed: '/Second.jspx' 'VIEW'.
Ideally to stop this occurring we need to either disable or set the Second App tab's rendered property to false, through the following EL expression:
#{!securityContext.userInRole['role2']}
The result:

You'll need to make this change to every tab into every subsystem's page (First.jspx, Second.jspx, Third.jspx).
---
If we now open the first activity in the First subsystem page we get:

Yet if we open the second activity we get the following empty content:

This is to be expected as we haven't allocated the second.xml (or even the third.xml) to the role1 privilege. As back in step 6, allocate role1 against these under the jaxn-data.xml editor, ADF policies tab, Task Flow tab:

Alternatively if you don't want these activities available to role1, instead change the commandLink's to disable or un-render properties as per the EL securityContext example above.
--
In conclusion we see the UI Shell works pretty seamlessly with ADF Security, with the small caveat that you need to know which parts of the UI Shell to grant privileges to all users/roles.
Wednesday 2 December 2009
Upgrading WLS using the Oracle Smart Update utility
Oracle provides the Smart Update utility to upgrade WebLogic Server installations between versions, or to apply specific patches applied by Oracle Support. This post considers upgrading a 10.3.1 server to 10.3.2, not applying patches. As usual your mileage may vary so be diligent in checking these instructions beforehand.
The Oracle Smart Update utility is documented here.
The general steps to run the Oracle Smart Update utility and upgrade the server are as follows:
1) Ensure your WLS and any managed servers are not running. In turn it would be a good idea to backup your server before running this procedure, in particular if it's a production server.
2) (For whatever reason I couldn't invoke the following utility from Windows Explorer, so I had to invoke it via the command line)
2.1) Under Windows open the command prompt at <wls_home>\utils\bsu
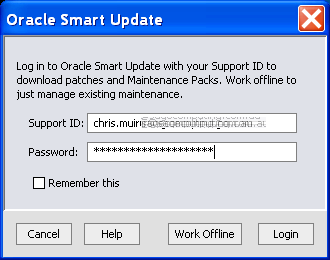
2.2) Execute the bsu.cmd. This displays the Oracle Smart Update dialog to enter your Oracle Support user ID and password:
3) Assuming your login details are correct you'll be presented with the Oracle Smart Update dialog. This can take some time to open as the utility scans your existing WLS patches
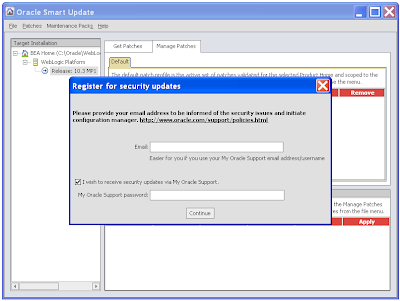
4) You may be prompted to "Register for security updates", take your choice, be annoyingly nagged by Oracle, or miss applying security patches in the future:
5) The end result:
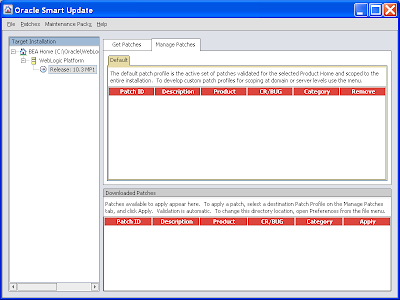
6) The Target Installation tree on the left hand side shows you the WLS servers the patch engine will work with. We're not interested in the content on the right. Presumably it includes one off patches to apply as supplied by Oracle Support, or hot security fixes applying to all WLS installations. I've yet to see one of these so can't comment on what you'll actually see.
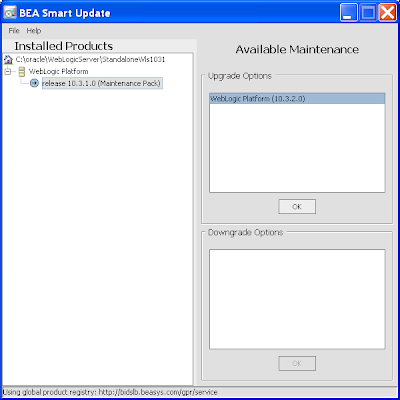
7) To upgrade your WLS between versions you apply a "Maintenance Pack". Click on the same named menu option followed by the sub-option Update. This launches the BEA Smart Update dialog. On selecting your existing WLS server in the left tree, you'll see the option to apply the Upgrade Option in the right, in this case specifically WebLogic Platform (10.3.2.0):
The Oracle documentation for Maintenance Pack installations is here.
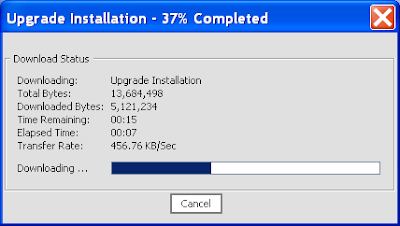
8) Selecting the Ok button will display a download dialog:
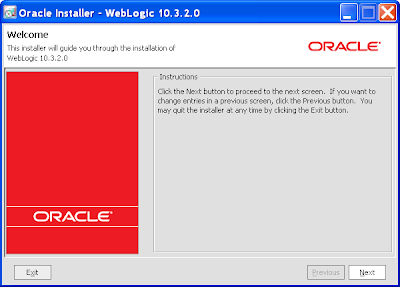
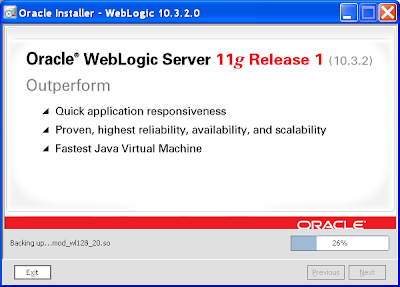
9) On the file downloading you'll be presented with the Oracle Installer for WebLogic 10.3.2.0:
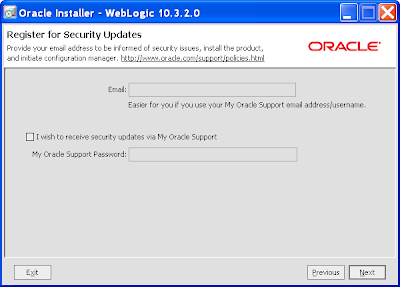
10) Again you'll get a chance to "Register for security updates". Be brave and skip it:
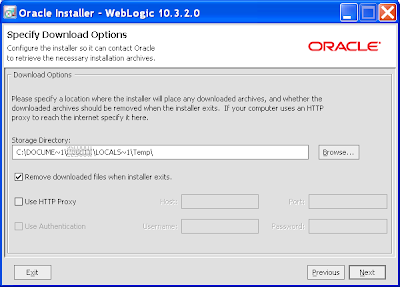
11) The next page allows you to specify the download location of any additional files, whether the files should be removed after installation, and the HTTP Proxy options to get through your firewall including username and password:
12) You'll then get another download screen and a chance for a coffee or 2 (make that 4):
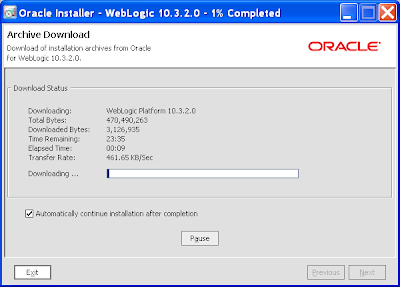
If the downloads fails half way through, don't give up as the download utility supports resumes, just wait for it to timeout and then ask it to continue downloading.
13) You'll then be given one last chance to back out:
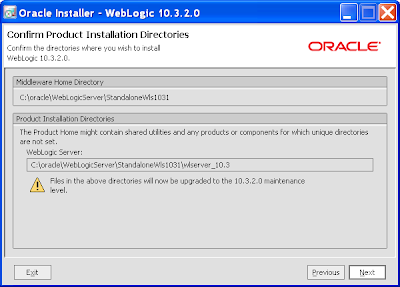
14) After which there's no backing out:
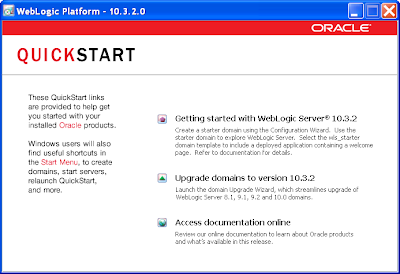
15) Just click Done on the final page. If the QuickStart dialog shows, close it:
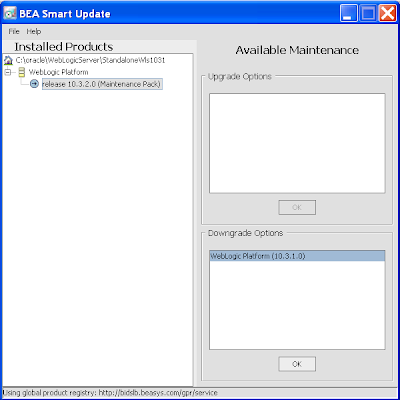
16) In turn the BEA Smart Upgrade dialog will also show detailing the new 10.3.2 upgrade. You'll note in the lower part of the right window, you can downgrade from 10.3.2 to 10.3.1 if necessary. You can close this dialog:
17) Returning to the Oracle Smart Update window it'll misreport the current version which you can ignore.
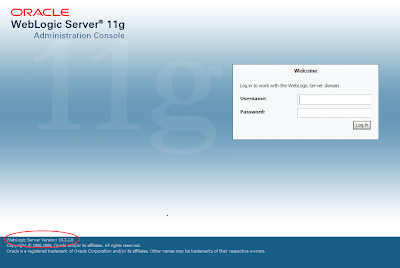
18) To verify the install the easiest thing is to start your managed servers and then access the console login. At the bottom of the page you'll see the server version:
19) It's probably worth investigating the server logs to see if any unexpected exceptions have been thrown.
The Oracle Smart Update utility is documented here.
The general steps to run the Oracle Smart Update utility and upgrade the server are as follows:
1) Ensure your WLS and any managed servers are not running. In turn it would be a good idea to backup your server before running this procedure, in particular if it's a production server.
2) (For whatever reason I couldn't invoke the following utility from Windows Explorer, so I had to invoke it via the command line)
2.1) Under Windows open the command prompt at <wls_home>\utils\bsu
2.2) Execute the bsu.cmd. This displays the Oracle Smart Update dialog to enter your Oracle Support user ID and password:

3) Assuming your login details are correct you'll be presented with the Oracle Smart Update dialog. This can take some time to open as the utility scans your existing WLS patches
4) You may be prompted to "Register for security updates", take your choice, be annoyingly nagged by Oracle, or miss applying security patches in the future:

5) The end result:

6) The Target Installation tree on the left hand side shows you the WLS servers the patch engine will work with. We're not interested in the content on the right. Presumably it includes one off patches to apply as supplied by Oracle Support, or hot security fixes applying to all WLS installations. I've yet to see one of these so can't comment on what you'll actually see.
7) To upgrade your WLS between versions you apply a "Maintenance Pack". Click on the same named menu option followed by the sub-option Update. This launches the BEA Smart Update dialog. On selecting your existing WLS server in the left tree, you'll see the option to apply the Upgrade Option in the right, in this case specifically WebLogic Platform (10.3.2.0):

The Oracle documentation for Maintenance Pack installations is here.
8) Selecting the Ok button will display a download dialog:

9) On the file downloading you'll be presented with the Oracle Installer for WebLogic 10.3.2.0:

10) Again you'll get a chance to "Register for security updates". Be brave and skip it:

11) The next page allows you to specify the download location of any additional files, whether the files should be removed after installation, and the HTTP Proxy options to get through your firewall including username and password:

12) You'll then get another download screen and a chance for a coffee or 2 (make that 4):

If the downloads fails half way through, don't give up as the download utility supports resumes, just wait for it to timeout and then ask it to continue downloading.
13) You'll then be given one last chance to back out:

14) After which there's no backing out:

15) Just click Done on the final page. If the QuickStart dialog shows, close it:

16) In turn the BEA Smart Upgrade dialog will also show detailing the new 10.3.2 upgrade. You'll note in the lower part of the right window, you can downgrade from 10.3.2 to 10.3.1 if necessary. You can close this dialog:

17) Returning to the Oracle Smart Update window it'll misreport the current version which you can ignore.
18) To verify the install the easiest thing is to start your managed servers and then access the console login. At the bottom of the page you'll see the server version:

19) It's probably worth investigating the server logs to see if any unexpected exceptions have been thrown.
Subscribe to:
Posts (Atom)